8 Minute Reseller Hosting Package Setup Guide
When starting out with your first Reseller hosting package it may seem confusing about how you configure alot of the settings in WHM ( Web Host Manager) this article be your 8 Minute setup guide for your reseller account. It will show you how to go from receiveing your welcome details to deploying your first cPanel account all in 8 Minutes.
These instructions are for Linux Reseller Hosting Accounts that have cPanel/WHM access
1. Login to WHM
You should have received login instructions on how to login to your WHM control panel. It is generally http://yourdomain.com.au/whm or http://yourdomain.com.au:2086. You will need to enter in your username and password that has been supplied to you. Be careful to enter the correct details here as normally hosting providers will have lockouts if you enter the incorrect username and password more than 3 times. You will notice when you login for the first time there will be no accounts listed. The next step is to create your packages.
2. Creating Packages
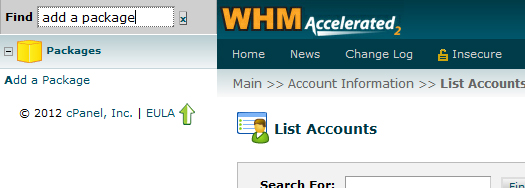
You need to create packages in order to be able to create new cPanel accounts underneath your reseller account. You can create a package by scrolling down and looking for the Menu “Packages” or you can enter the word “add a package” in the Find Box at the top of the page.

You will then need to click on ” Add a Package” . This will bring up the configuration page for your new package.
3. Name your new Package
You will now need to name the Package. Input your chosen package name in the field, some good examples would be Business, Corporate, Enterprise or Gold, Silver and Broinze. Try and be creative as your client will see the package name when they are logged into their cPanel so I would suggest you don’t call the package “Package1”.
4. Assign Resource Limits to your new Package
This is where the main configuration of your packages is conducted. The main way of creating your packages is to divide up your resources provided in your reseller plan into percentages. Say for instance you were given 40GB Disk Space and 200GB Bandwidth for your reseller package. Using this quota you may want to have 10 x 1GB Disk Space Packages called “Light Business” and 15 x 2GB Disk Space packages called “Enterprise”. This would allocate your complete quota of 40GB into the 25 Accounts. You would need to create two packages (Light Business and Enterprise) and set their disk space usage at 1GB and 2 GB respectively.
You can also do the same calculations for Bandwidth, FTP Accounts, Email Accounts and MySQL databases. This will ensure your reseller hosting packages will be feature rich and people will want to purchase them.

Please note there are some reseller hosting providers which can enable you to have “Overselling” enabled on your reseller hosting package. What this addon enables you to do, Is it enables you to “Oversell” and create packages even when you do not have any space left to allocate as a package. You still cannot exceed the disk quota for your Reseller package but WHM will not stop you from adding extra accounts once your quota is allocated to your cPanel accounts. Please be very careful using this add-on as it can mean if all of your sites suddenly decide to use all of their allocated storage or bandwidth you can run out of resources very quickly which may take all of your sites offline if you exceed your bandwidth or disk usage.
5. Additional Settings for your New Package
There are also some additional settings for your package such as assigning a dedicated IP which is great for SSL certificates also setting custom cPanel themes and languages.
Once you have selected these options you will need to save your new package. You can repeat steps 1-5 if you need to create more packages.
6. Create New Account
Now that you have created your new package you can now create your first cPanel account. In the same search box at the top of the page Type “Create a new account” Then click on the link (Create a New Account).
Here you will be able to type the domain, username password and also select your newyly created package from the list. On the right hand side of the page you will see your current resource allocation for your entire reseller hosting package.
Once you have enetered all the details for the new domain click ” Create”
7.Congratulations! You have now configured your Reseller Hosting Account Packages and have created your first cPanel account and all in just 8 Minutes.
In the next article we will be looking into how you can manage your clients using WHMCS(Web Host Manager Complete Solution) and client-exec and your reseller hosting package.
| Hosting Options & Info | VPS | Web Solutions & Services |
|---|---|---|
