“Why is my site down?” Preparing your website for a big sale or buttloads of traffic
A site crash — one of the biggest nuisances of the internet. Sudden, crippling, and tedious to get back up and running. What could be so detrimental to your business, can be simply avoided with a little knowledge.
And we are here to educate.
Although few are, many cases of site crashes aren’t necessarily the web hosting provider’s fault. Let’s go through a typical situation:
- Individual: “Wow wow wow, why is my site down? I’m in the middle of a sale!”
- Individual: “I’m calling my web hosting provider, they’ll fix it.”
- Tech Support: “Oh, 2k hits per minute, no wonder.”
- Tech Support: “It’s gonna take a while to bring it back up.”
Now, that could’ve all been prevented with some early preparation. Tech Support aficionado Gaetano and SysAdmin Mitch have lent us their brains for a while to create a quick guide on how to prepare your website for a tsunami of traffic flow.
“Zero preparation means sales campaigns fail.”
1. Check with your web hosting provider
Give us a minimum 1-week notice:
- We can view your account and check it’s ability to handle traffic and make necessary upgrades.
- We both won’t waste time wondering what’s going on.
- We will be prepared.
- There’s really no point calling halfway through the site crash.
Give us expected number of traffic:
It’s hard to predict, but could be taken from social media pages; e.g. Facebook has 20,000 followers? Estimate half of that.
What your hosting could need:
- More RAM.
- CloudLinux — Improves stability and security on shared servers.
- LiteSpeed — Reduce your RAM usage by almost 50%. For more info, check out our article.
- Maybe, upgrade to a more robust hosting product; i.e. from shared hosting to a VPS or dedicated server.
2. Optimise and improve your site
There are two ways which you can approach this step and it all depends on whether or not you have a web developer, IT technician or relevant tech-proficient person at hand. I mean, you can do it manually if you fancy the challenge, but why would you want to when there’s a plugin that does it for you — WP Rocket.
Install WP Rocket or WP Super Cache
The easiest, quickest and safest way to do this is to install one of the aforementioned plugins. If you find yourself to be sufficiently knowledgeable in this sort of stuff, you’re more than welcome to do manually what the plugins do, without their price-tag. That is, if you’re up for an adventure.
Consult your web developer or IT technician to check over the site
Ask your relevant tech guru to complete the following checklist of your site (if they haven’t already):
- Install WP Rocket or WP Super Cache
- Optimise images
- Boost security
- Ensure the site’s security plugin allows you to set firewall rules.
- This helps you lock people out from spamming your site, which saves RAM for what you need it for most — real visitors.
- If you’re unsure of which/any plugins to use, check out our handy article 5 Tools for Keeping your Website Secure.
- Load test
- An external load testing service sends fake traffic to your site to test how it copes with the load and find the breaking point, so that when traffic actually spikes, you know the limit.
- Siege is a good example.
3. Get yourself a Content Delivery Network (CDN)
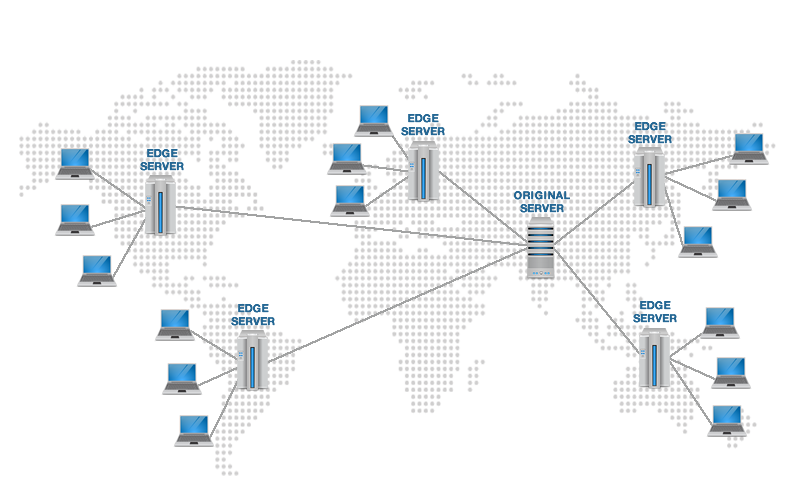
A CDN is essentially an external form of caching. By proper definition (from Webopedia.com), it is “a system of servers that deliver web pages and other web content to a user based on the geographic locations of the user, the origin of the web page and a content delivery server.”
Our summary (in a web hosting context): CDNs essentially relieve the stress on your server(s) by taking snapshots of your website(s) and hosting them on their own servers.
CloudFlare is a great service that basically takes a copy of your site and sends it to around 101 servers and stores it on their own server, so that when there’s a visitor, they reach a copy of your site — reducing the load on your server and delivering it faster.
CloudFlare definitely helps, or rather as our SysAdmin guru Mitch said, “you need it.” Get it if you don’t have it. If you do, check with your web dev if you should upgrade it.
For more information on what it does for your website, check our two extensive articles here and here.
4. Get yourself some website caching
On the other hand, you should also get yourself a form of internal caching. If you’ve installed WP Rocket, WP Super Cache, or a similar plugin, you’re already halfway there.
Internal caching optimises how data is processed and transmitted from server to user (i.e. from us to you).
There are certain levels of depth in terms of internal caching:
- Website-level:
- Minimising code to make it load faster, e.g. taking out comments and spaces.
- Examples: WP Rocket & WP Super Cache.
- Server-level:
- For VPS and dedicated server, you can check for server caching with your web host.
- Example: OP Cache
- CDN-level:
- See above in point 3.


